
Buy It or Do It Yourself Plyo Boxes
 I absolutely love the smell of freshly cut wood, whether I’m hacking a tree down with my chainsaw or creating something amazing with my own two hands. I’ve built my own home, twice, fulfilled honey-do orders for my wife and created gym equipment for my own use.
I’ve heard that plyo boxes are the shiz-niz these days. If you’ve been involved in Cross-fit for a while, you’ve most likely hopped on and off of one of these wooden boxes one or two thousand times. Plyometrics is a great way to increase the flinch reflex in your muscles and can virtually increase your explosiveness, specifically your vertical explosiveness.
So how do you build one of these plyo boxes? What are the dimensions and what kind of wood will you need to make one?
All good questions….let’s answer some shall we, along with an additional tip or two?
I’m 38 years old, going on 39, and I’m kind of addicted to basketball. I would like to play three times a week, but have heard that playing that much can be bad on your joints and ligaments. I also have read that, as a player, you should be training around 90% of the time and playing games only 10% of the time. So, I tweaked the numbers a bit and decided that I would train 75% of the time and play games 25%…give or take 10%.
Convert Speaker Boxes into Plyo Boxes
With that said, one of my training exercises is plyometrics using plyo boxes, and I took the easy route to building my plyo boxes. I converted two pre 1960 speaker boxes into my plyo boxes. They were approximately 24 inches in width by 30 inches deep by 36 inches in height and were built using 3/4 inch plywood. They’re solid.
So if you have some older speaker boxes laying around, or find some in a thrift store that you can get for less than $20 a piece, you’ll be saving yourself time and money. Make sure they’re made out of solid plywood, not MDF or particle board, and buy them!
Buy Plyo Boxes already Made
If you don’t have a shop or any woodworking tools, maybe the best option is to simply buy some plyo boxes.
If you’d like me to build them for you, it would cost you around $350 to $400 for me to build them and ship them to you. They’d be made just like the boxes I currently use. Shipping would be included and would range depending on whether you’d like me them already assembled or ready for you to assemble.
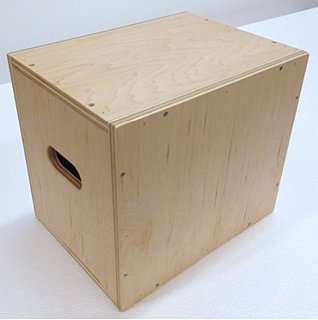
You’d get three plyo boxes that are 20″ x 24″ x 30″. Or, if you’d like a custom size, let me know in the comments below.
Or, you can shop for some on Amazon here: wood plyo boxes.
Built It Yourself Plyo Boxes
If you’re like me, you’d rather built the boxes yourself instead of just forking out the cash to buy some. It’s not just about having the plyo boxes, it’s about the journey, and the accomplishment of building your own equipment….being a self made athlete.
Yes, it’s all about pride, in all humility.
You can just build one box. Well, I guess you could, but if you really want to get serious with plyometrics, you’ll want to have at least three boxes varying in size. Depending on your current strength, I would recommend starting with a 20″, 24″ and 30″ to 36″ or above in height. If you’re a female, you may want to go with something like 16″, 20″ and 24″ in height.
So, things you’ll need in order to build your own boxes are: 3/4″ plywood (with a nicer finish, if you want nice looking boxes…and not OSB), 2x2x8’s, 1 1/4″ wood screws, wood glue (optional), table saw or circular saw, drill, drill bits, wood glue or Gorrilla glue and a wood sander/sandpaper.
STEP 1: Begin by cutting your sheets of plywood. Depending on the tools you have available, you’ll want to use either a table saw or circular saw. If you don’t have a table saw, but would like to buy one for this, and future projects, The Sharp Cut has great specs and reviews on many different brands and types of saws that’ll get the job done. Just remember, use absolute precaution when using a saw, especially a table saw. If you’ve never used one before, watch a how-to video, such as the one here: Table Saw Safety.
By building the same plyo box three times, you can get the three heights you need. So our box is going to be 20″ x 24″ by 30″.
You’ll need to cut the following pieces:
2 – 30″ x 20″
2 – 30″ x 22.5″
2 – 18.5″ x 22.5″
STEP 2: Start by fitting the pieces together before drilling or gluing anything. Make sure it fits, right!? If you purchased the 2x2x8 pieces of wood, you can cut these into sections to place in corners where you feel the plywood will need extra support. The strongest sides to your box are the ones that have plywood underneath them, versus to the side of them. Make sense?
Once you fit them all together and you know which piece goes where, pre-drill wholes every few inches along the edges of the plywood. It keeps it from splitting when you start putting screws as well as the Industrial Washers in.
STEP 3: Add wood glue along the edge of any piece that will be up against another piece and screen the dang thing together! Where you added the sections of 2x2x8, screw into that as well.
STEP 4: Sand down any rough edges, in the event you miss a jump and make contact with your shins. I like to sand it until it’s sort of rounded….but I also make sure that I never miss my jump. It only takes one miss to learn your lesson…and that hasn’t happened to me yet…crossing my fingers here.
And that’s it. Pictures will come later….I just wanted to get this post up before it got put on the backburner. If you have any questions, please let me know!